
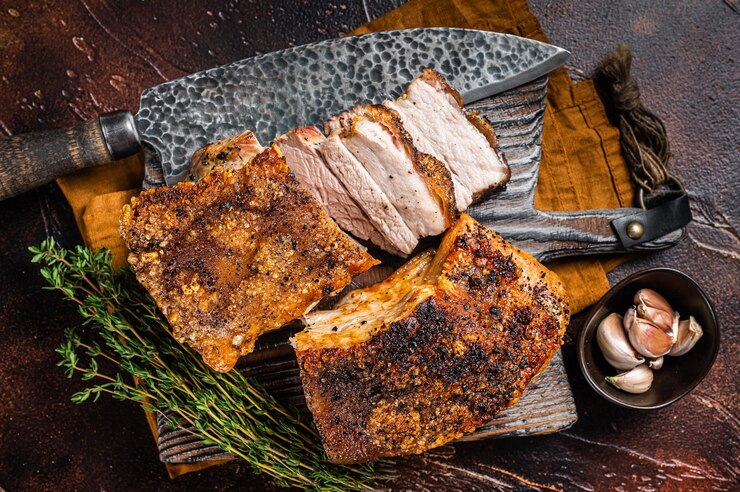
Few dishes are as satisfying as perfectly roasted pork belly with tender, juicy meat and golden crackling that shatters with every bite. The secret to achieving this delicious combination lies in choosing the right cut of pork, preparing the skin properly and giving the meat enough time to cook slowly. While crispy crackling might seem difficult to master at home, a few simple techniques can make a remarkable difference to the final result. The most important step is removing moisture from the skin before roasting, as dry skin is far more likely to blister and crisp beautifully in the oven. A combination of gentle roasting and a final blast of high heat allows the fat to render while the meat becomes soft and flavourful. With the right seasoning, careful temperature control and a little patience, you can prepare restaurant-quality pork belly in your own kitchen. This complete guide covers everything you need to know, including a reliable roast pork belly recipe, practical crackling tips, serving suggestions and common mistakes to avoid.
What Makes Pork Belly So Juicy and Flavourful?
Pork belly is cut from the underside of the pig and contains alternating layers of meat and fat. This natural marbling gives the cut its rich flavour and helps keep the meat moist during a long roasting process. As the pork cooks, the fat gradually renders, basting the meat and creating a wonderfully tender texture.
The skin is equally important because it becomes the crackling that makes roast pork belly so special. When the skin is dry and exposed to sufficiently high heat, its surface blisters and turns crisp. If moisture remains trapped beneath the skin, the crackling may become tough or chewy instead.
The goal is to cook the meat until it is tender without allowing the skin to burn. Starting with a moderate oven temperature and finishing with a higher heat gives you greater control over both textures.
The Secret to Perfect Pork Belly Crackling
1. Choose the Right Cut of Pork Belly
Look for a piece of pork belly with an even thickness, a generous layer of fat beneath the skin and a clean, unbroken rind. A cut with balanced layers of meat and fat will generally produce better results than one that is almost entirely fat or unusually lean.
Ask your butcher to score the skin if it has not already been prepared. The cuts should go through the skin and into the surface fat without cutting deeply into the meat. This helps the fat render and makes the finished crackling easier to portion.
2. Dry the Skin Thoroughly
Dry skin is one of the biggest secrets to crunchy pork crackling. Pat the rind thoroughly with paper towels before seasoning, paying attention to any creases where moisture may collect.
For even better results, place the uncovered pork belly on a rack over a tray in the refrigerator for 12 to 24 hours. This allows air to circulate around the skin and helps it dry naturally. Keep raw pork on the lowest refrigerator shelf so that juices cannot drip onto other foods.
If you have little time, dry the skin as thoroughly as possible with paper towels and leave the pork uncovered in the refrigerator for as long as your schedule allows.
3. Score the Skin Correctly
Scoring creates small channels that help the fat beneath the skin render during roasting. If the butcher has not scored the rind, use a very sharp knife to make shallow parallel cuts approximately 1 cm apart.
Avoid cutting through the skin into the meat because exposed meat juices can make the crackling less crisp. If the cuts are too deep, moisture may collect in the grooves and prevent even blistering.
4. Use Salt to Draw Out Moisture
Salt helps season the pork and encourages moisture to move away from the surface. Sprinkle a generous, even layer over the skin shortly before roasting, then rub your chosen seasonings into the flesh side.
Some cooks salt the skin during the refrigerator-drying stage. If you do this, remove any visibly wet patches and excess surface moisture before the pork goes into the oven. The important point is to start roasting with a dry rind rather than a damp one.
5. Roast Slowly Before Increasing the Heat
Cooking pork belly at a moderate temperature gives the fat time to render and the meat time to soften. A final period at high heat then helps the skin blister and become crisp.
Starting at maximum heat can brown the skin before the fat has rendered properly. On the other hand, cooking at a low temperature throughout may leave the rind rubbery. A two-stage roasting method offers a dependable balance between tender meat and crunchy crackling.
Full Recipe: Juicy Roast Pork Belly with Golden Crackling
Ingredients
- 1.5 kg pork belly, skin on
- 15 ml olive oil, for the flesh side
- 15 ml coarse salt, approximately, for the skin
- 5 ml freshly ground black pepper
- 10 ml smoked paprika
- 4 garlic cloves, finely crushed
- 10 ml dried thyme or chopped fresh rosemary
- 2 onions, thickly sliced
- 2 carrots, roughly chopped
- 250 ml chicken stock or water
- 2 bay leaves
Instructions
Step 1: Prepare the pork belly
Remove the pork belly from its packaging and pat the skin completely dry with paper towels. Check that the skin is scored, making shallow cuts through the rind and into the surface fat if necessary. Avoid cutting into the meat.
For the best crackling, place the pork uncovered on a rack in the refrigerator overnight. If you cannot prepare it ahead, dry it thoroughly and continue with the recipe.
Step 2: Preheat the oven
Preheat your oven to 160°C, using conventional oven settings. If you use a fan-assisted oven, approximately 150°C is a good starting point.
Arrange the sliced onions and carrots in a roasting tray. Add the bay leaves and pour the stock or water around the vegetables. The liquid should sit in the tray rather than cover the pork skin.
Step 3: Season the meat
Rub the olive oil, black pepper, smoked paprika, garlic and thyme or rosemary over the flesh side of the pork. Avoid getting wet seasoning on the rind because it can interfere with crisping.
Turn the pork skin-side up and sprinkle the salt evenly over the rind, working a little into the score marks. Position the pork on a rack over the roasting tray if possible, keeping the skin above the liquid.
Step 4: Roast the pork slowly
Place the tray in the oven and roast for approximately 1 hour 45 minutes to 2 hours, depending on the thickness of the pork belly. The meat should become tender and the fat should begin to render.
Check the tray occasionally and add a little more hot water if the liquid has evaporated and the vegetables are beginning to burn. Keep the skin dry throughout the process.
Step 5: Increase the heat for crackling
Once the meat is tender, remove the tray from the oven and carefully check the skin. If moisture has collected on the surface, gently blot it with paper towels.
Increase the oven temperature to 230°C. Return the pork to the oven and roast for another 20 to 30 minutes, watching closely as the skin bubbles and turns golden. If some areas crisp faster than others, rotate the tray to encourage even browning.
The exact time will depend on your oven and the thickness of the rind. If the skin has not crisped fully, continue checking it at short intervals rather than leaving it unattended.
Step 6: Rest before slicing
Remove the pork belly from the oven when the crackling is crisp and the meat is tender. Transfer it to a board and rest it for about 10 to 15 minutes without covering the skin, as trapped steam can soften the crackling.
Use a sharp knife to slice through the crackling and meat. If the rind is especially firm, a serrated knife can help you cut cleanly without crushing the layers.
Step 7: Make a quick pan gravy
While the pork rests, place the roasting tray over medium heat if it is suitable for stovetop use. Remove the bay leaves, then mash the softened vegetables into the cooking juices.
Add a little extra stock or water and simmer for several minutes. Strain the gravy if you prefer a smoother texture, then taste and adjust the seasoning. Serve it alongside the pork rather than pouring it over the crackling.
Recipe Success Tips
- Start with completely dry skin for the best chance of crisp crackling.
- Keep stock and other liquids away from the rind.
- Use a meat thermometer to check the thickest part of the meat without touching bone or resting the probe against a large pocket of fat. For food safety, follow the applicable guidance for whole pork cuts, and cook further if the meat is not tender enough for your preferred texture.
- Watch carefully during the high-temperature stage because crackling can change from golden to burnt quickly.
- Rest the pork uncovered so the skin stays crisp.
How to Tell When Pork Belly Is Properly Cooked
Perfect pork belly should have tender meat, rendered fat and crackling that is crisp rather than leathery. The meat should yield easily when pierced with a knife, while the skin should have a dry, blistered surface.
A food thermometer is useful for checking safety, especially if you are unfamiliar with the cut. For whole pork cuts, a minimum internal temperature of 63°C followed by a three-minute rest is a common food-safety recommendation. However, pork belly often needs substantially more cooking time to become soft and tender because its connective tissue benefits from prolonged heat.
This means temperature and tenderness serve different purposes. Use a thermometer to assess safe cooking, then allow more time if the pork still feels tough. The final high-heat stage is primarily for crisping the skin, not for trying to cook a raw centre quickly.
Common Pork Crackling Problems and How to Fix Them
Why Is My Pork Crackling Chewy?
Chewy crackling usually means the skin was too moist or did not receive enough high heat. The fat may also need more time to render.
How to fix it: If the meat is already cooked, pat the skin dry and return the pork to a hot oven at approximately 230°C. Watch it closely and remove it once the rind is blistered and crisp. Avoid adding water or gravy to the skin.
Why Is the Crackling Burnt but the Meat Still Tough?
This often happens when the oven temperature is too high at the beginning or the pork is unusually thick. The skin browns before the meat has had enough time to soften.
How to fix it: Use a lower temperature for the main roasting stage, then increase the heat only after the meat is tender. If the crackling is already dark, shield it loosely with foil while the pork finishes cooking, keeping the foil away from the skin where possible.
Why Has the Skin Not Blistered?
The rind may have been damp, the oven may not have been hot enough or the pork may have been positioned too far from effective heat circulation.
How to fix it: Dry the skin, check the oven temperature and increase the heat for a short final roasting period. If using a grill or broiler to finish the skin, keep the pork under constant supervision because the fat can cause rapid browning.
Why Is There Too Much Fat Left Under the Skin?
Some fat is essential for juicy pork belly, but thick pockets of unrendered fat can feel heavy. This may happen when the cut is especially thick or the initial roasting period is too short.
How to fix it: Allow more time at a moderate temperature before crisping the rind. Avoid trying to solve the problem by roasting at maximum heat for the entire cooking period.
Delicious Seasoning Ideas for Roast Pork Belly
The classic combination of salt and black pepper is difficult to beat, but pork belly also works beautifully with herbs, spices and sweet or tangy flavours. Season the meat rather than coating the rind in wet marinades, then serve sauces separately to protect the crackling.
Garlic, Rosemary and Lemon
Crushed garlic, chopped rosemary, black pepper and a little lemon zest create a fresh, savoury flavour. Rub the mixture into the flesh side before roasting and reserve the lemon juice for the gravy or serving.
Smoky Paprika and Cumin
Smoked paprika, ground cumin, coriander and black pepper give the pork a warm, earthy flavour. This combination pairs well with roasted sweet potatoes, corn and a crisp cabbage slaw.
Honey and Mustard Glaze
Mix honey with wholegrain mustard and a small amount of apple cider vinegar. Brush the glaze onto the meat side during the final few minutes of cooking, keeping it away from the crackling so the sugar does not burn the skin.
Asian-Inspired Ginger and Soy
Combine grated ginger, garlic, soy sauce and a little brown sugar for a savoury, sweet glaze. Use it sparingly on the meat side or serve it as a dipping sauce after roasting. Keeping this wet mixture off the skin helps preserve the crisp finish.
What to Serve with Crispy Roast Pork Belly
Pork belly is rich, so the best side dishes bring freshness, acidity or a little sweetness to the plate. Classic roast potatoes are an excellent choice because their crisp edges complement the crackling. Roasted carrots, pumpkin or sweet potatoes add natural sweetness, while green beans, broccoli or cabbage provide a lighter contrast.
For a traditional Sunday lunch, serve the pork with roast potatoes, seasonal vegetables and a rich pan gravy. Apple sauce is another favourite because its gentle sweetness and acidity balance the pork’s richness.
For a South African-inspired meal, pair pork belly with roasted butternut, creamy pap or crispy potatoes and a fresh tomato-and-onion salad. A tangy cabbage slaw or lightly dressed green salad is particularly useful when serving the pork during warmer weather.
If you are entertaining, slice the pork just before serving and arrange the pieces with the crackling facing upwards. Keep sauces in separate bowls so guests can enjoy the crisp skin without it becoming soggy.
Can You Prepare Pork Belly Ahead of Time?
You can prepare pork belly in advance, but the best method depends on whether you want to serve it whole or in portions. Drying the skin uncovered in the refrigerator for 12 to 24 hours is one of the most useful preparation steps because it improves the chances of achieving crisp crackling.
You can also roast the pork until tender ahead of time, cool it promptly and refrigerate it in a covered container within two hours of cooking. Keep the crackling as dry as possible and store the meat separately from any gravy. For food safety, refrigerate leftovers at 5°C or colder and use them within three to four days, or freeze them for longer storage.
When reheating, warm the pork until it is steaming hot throughout, then finish it in a hot oven to restore some crispness to the skin. The microwave is convenient for the meat but often softens the crackling, so a conventional oven or air fryer is preferable for the final crisping stage. Avoid reheating the pork repeatedly, and only reheat the portion you intend to eat.
How to Store and Reheat Leftover Pork Belly
Allow leftover pork belly to cool slightly before refrigerating it promptly. Divide large portions into smaller containers so they cool more quickly, and keep them covered to prevent contamination and drying.
For the best results, store the meat and crackling separately if practical. Reheat the meat gently with a spoonful of stock or gravy to prevent it from drying out, then place the skin under high heat until crisp. An air fryer can also work well for smaller pieces, but check frequently because the exposed fat can brown quickly.
Leftover pork belly is delicious in toasted sandwiches, wraps, rice bowls and noodle dishes. Add thin slices to a sandwich with apple slaw and mustard, or serve diced pork with fried rice and spring onions. These simple ideas turn leftovers into satisfying meals without requiring another lengthy roasting session.
The secret to juicy pork belly with golden, crunchy crackling every time is a combination of dry skin, well-rendered fat, steady roasting and a carefully controlled burst of high heat. Choosing a good cut with balanced layers of meat and fat gives you the best starting point, while scoring and seasoning help develop flavour and texture. Drying the rind thoroughly before cooking is one of the most important steps because moisture is the enemy of crisp crackling. Roasting at a moderate temperature first allows the meat to become tender before the oven is turned up to blister the skin. Keeping liquids and wet sauces away from the rind helps preserve its crunch, even when you serve the pork with a rich gravy or sweet glaze. With the full recipe and troubleshooting tips in this guide, you can approach roast pork belly with greater confidence and adapt the seasonings and sides to suit any occasion. Serve it freshly sliced with your favourite vegetables, roast potatoes and a tangy sauce for a memorable meal that delivers tender, flavourful pork beneath beautifully crisp crackling.