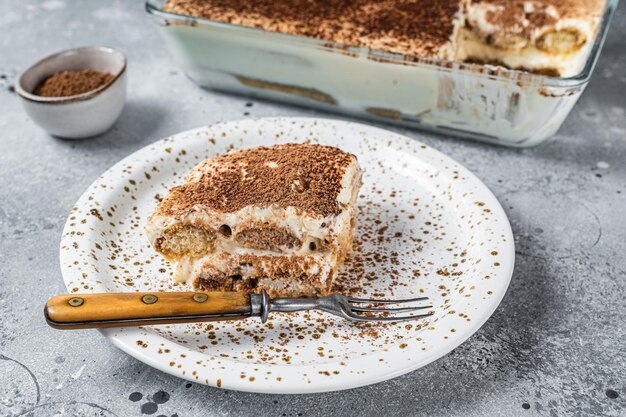
Tiramisu is a classic Italian dessert beloved for its creamy texture, rich coffee flavor, and delicate layers of cocoa. Traditionally made with mascarpone cheese and cream, tiramisu is off-limits for those with dairy sensitivities or following a dairy-free lifestyle. But don’t worry — you can still indulge in this decadent dessert without compromising on flavor or texture. In this article, we’ll show you how to make a dairy-free tiramisu that tastes just like the real thing.
Ingredients for Dairy-Free Tiramisu
For the Dairy-Free “Mascarpone” Cream:
- 1 1/2 cups raw cashews (soaked for at least 4 hours or overnight)
- 1/4 cup full-fat coconut milk (or another plant-based milk)
- 1/4 cup coconut cream (for a thicker texture)
- 2-3 tablespoons maple syrup (or sweetener of choice)
- 1 teaspoon vanilla extract
- 1 tablespoon lemon juice (optional, for a slight tang)
- Pinch of salt
For the Coffee Soak:
- 1 cup strong brewed coffee (cooled to room temperature)
- 2 tablespoons coffee liqueur (optional, for added flavor)
- 2 tablespoons maple syrup or sugar (optional, for sweetness)
For the Tiramisu Assembly:
- 1 package dairy-free ladyfingers (or homemade gluten-free option)
- Cocoa powder (for dusting)
- Dark chocolate shavings (optional, for garnish)
Step 1: Make the Dairy-Free Mascarpone Cream
The key to a dairy-free tiramisu is creating a creamy filling that mimics the texture of traditional mascarpone cheese. For this, cashews are an excellent base, as they blend into a smooth, rich cream.
- Soak the cashews: Begin by soaking the raw cashews in water for at least 4 hours, or overnight if you have time. This softens them and helps achieve a smooth texture when blended. If you’re short on time, you can soak them in hot water for about 30 minutes as a quicker option.
- Blend the ingredients: Drain and rinse the cashews, then add them to a high-speed blender or food processor along with coconut milk, coconut cream, maple syrup, vanilla extract, lemon juice, and a pinch of salt. Blend until completely smooth and creamy, stopping to scrape down the sides as necessary. Taste the cream and adjust the sweetness or flavor as desired.
- Set aside: Transfer the dairy-free mascarpone cream to a bowl and set it aside in the fridge while you prepare the other layers.
Step 2: Prepare the Coffee Soak
The coffee soak is essential for soaking the ladyfingers and infusing them with that signature tiramisu flavor.
- Brew the coffee: Brew a cup of strong coffee. The stronger the coffee, the better it will soak into the ladyfingers without becoming too weak or watery.
- Sweeten the coffee: Once the coffee has cooled to room temperature, stir in the coffee liqueur (optional) and maple syrup or sugar if you prefer a sweeter soak. The liqueur adds a depth of flavor, but you can omit it for a non-alcoholic version.
- Let it cool: Ensure the coffee soak is completely cool before using it to soak the ladyfingers.
Step 3: Assemble the Dairy-Free Tiramisu
Now comes the fun part — assembling your dairy-free tiramisu.
- Prepare the ladyfingers: If you’re using store-bought dairy-free ladyfingers, gently dip each one into the coffee soak, making sure not to soak them too long, as they can become too soggy. Aim for a quick dip, just a couple of seconds on each side. If you can’t find dairy-free ladyfingers, you can make your own using a simple recipe with egg whites, sugar, and flour, or use a soft sponge cake cut into strips.
- Layer the tiramisu: In a 9×9 inch (or similarly sized) serving dish, place the first layer of dipped ladyfingers at the bottom. Spread a generous layer of the dairy-free mascarpone cream over the ladyfingers. Repeat the process, layering more soaked ladyfingers and cream until you have used up all the ingredients, ending with a final layer of mascarpone cream on top.
- Chill the tiramisu: Cover the dish with plastic wrap and refrigerate for at least 4 hours, or preferably overnight. This allows the flavors to meld together and the dessert to set properly.
Step 4: Garnish and Serve
Before serving, give your tiramisu a finishing touch:
- Dust with cocoa powder: Once the tiramisu has chilled and set, dust the top generously with cocoa powder. You can use a fine mesh sieve to achieve an even layer of cocoa powder.
- Optional garnish: For an extra touch, sprinkle dark chocolate shavings on top, or even some grated dairy-free chocolate for a more indulgent finish.
- Slice and serve: Cut into squares and serve chilled. Your dairy-free tiramisu is now ready to impress your guests with its rich, creamy texture and delicious coffee flavor.
Tips for Perfect Dairy-Free Tiramisu
- Soak the cashews well: The key to a smooth cream is soaking the cashews thoroughly. This helps achieve a creamy texture that closely resembles the richness of mascarpone.
- Adjust sweetness: The sweetness of the mascarpone filling can be adjusted to your taste. If you prefer a sweeter tiramisu, feel free to add more maple syrup or sweetener of your choice.
- Make ahead: Tiramisu tastes even better the next day, as the flavors have time to develop. If you’re preparing it in advance, it will be a great dessert to serve at a dinner party or special occasion.
- Use a quality coffee: Since coffee is the star of tiramisu, using a good-quality brewed coffee will elevate the dessert. Freshly brewed espresso or strong coffee works best.
- Non-dairy ladyfingers: If you can’t find dairy-free ladyfingers, you can make your own or substitute with sponge cake or even cookies like graham crackers, which can be dipped in the coffee soak.
Making dairy-free tiramisu that tastes like the real thing is easier than you might think. By using raw cashews for a creamy mascarpone substitute, adding a rich coffee soak, and layering it all together, you can create a dessert that rivals the traditional version. Whether you have dietary restrictions or simply want to try a dairy-free twist on this classic Italian treat, this recipe will satisfy your tiramisu cravings without missing out on flavor or texture. Enjoy every creamy, coffee-soaked bite!


