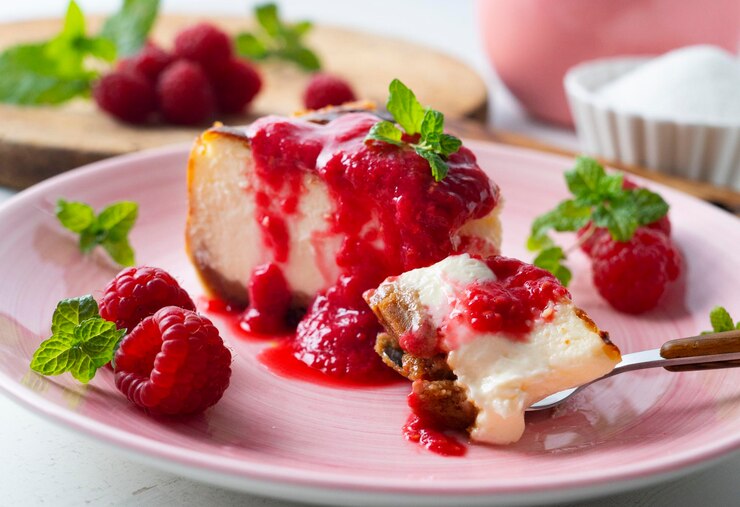
A homemade raspberry ricotta cheesecake is a delicious dessert that combines a smooth, creamy filling with the fresh taste of raspberries. Its buttery biscuit base adds a crisp texture that balances the soft cheesecake perfectly. Ricotta gives the filling a lighter texture than traditional cream cheese cheesecake while still creating a rich and satisfying dessert. The raspberries bring a gentle tartness that cuts through the sweetness and makes every bite enjoyable. This cheesecake is ideal for birthdays, family gatherings, Sunday lunches or special occasions when you want to serve something homemade. Although it looks impressive, the recipe uses simple ingredients and straightforward baking steps. With the right preparation and enough time to chill, you can make a beautiful raspberry ricotta cheesecake that slices neatly and tastes even better the next day.
The secret to a good ricotta cheesecake is getting the filling smooth without overmixing it. Ricotta naturally has a slightly grainy texture, so blending it before adding the other ingredients helps create a creamier result. A combination of ricotta and cream cheese gives the cheesecake structure while keeping the centre soft and delicate. Fresh or frozen raspberries both work well, making this dessert easy to prepare throughout the year. A gentle oven temperature helps the cheesecake bake evenly and reduces the risk of cracks. Once baked, the cheesecake needs time to cool and set in the fridge before serving. The result is a creamy raspberry dessert with a golden biscuit base and a fruity finish.
Why You Will Love This Raspberry Ricotta Cheesecake
This raspberry ricotta cheesecake offers a lovely balance of flavours and textures. The filling is creamy without feeling too heavy, while the raspberries add a fresh, slightly tart flavour. The biscuit base provides a buttery crunch that works well with the soft centre.
Ricotta also gives the cheesecake a slightly different texture from a traditional baked cheesecake. When combined with cream cheese, eggs and sugar, it creates a filling that holds together while remaining tender. You can use fresh raspberries when they are in season or frozen raspberries when fresh berries are expensive.
Another advantage is that you can prepare this cheesecake a day before serving. Chilling overnight allows the filling to firm up and makes slicing much easier. This makes it a practical dessert for entertaining because you can finish most of the preparation ahead of time.
Ingredients for Raspberry Ricotta Cheesecake
This recipe makes one cheesecake in a 23 cm springform cake tin. Use full-fat ricotta and cream cheese for the best texture.
For the buttery biscuit base
- 250 g plain digestive biscuits
- 125 g butter, melted
- 1 tablespoon sugar, optional
For the creamy ricotta filling
- 500 g full-fat ricotta cheese
- 250 g full-fat cream cheese, softened
- 180 g castor sugar
- 3 large eggs
- 1 teaspoon vanilla extract
- 2 tablespoons cornflour
- 150 ml fresh cream
- Zest of 1 lemon
- 1 tablespoon lemon juice
For the raspberry swirl
- 200 g fresh or frozen raspberries
- 2 tablespoons sugar
- 1 teaspoon lemon juice
- 1 teaspoon cornflour mixed with 1 tablespoon water
For decorating
- 100 g fresh raspberries
- Icing sugar for dusting, optional
- Fresh mint leaves, optional
How to Make Raspberry Ricotta Cheesecake
Prep time: 25 minutes
Cook time: 60 to 70 minutes
Cooling time: 1 hour
Chilling time: At least 6 hours
Servings: 10 to 12
Step 1: Prepare the biscuit base
Preheat your oven to 160°C. Lightly grease a 23 cm springform cake tin and line the bottom with baking paper.
Place the digestive biscuits in a food processor and crush them into fine crumbs. If you do not have a food processor, place the biscuits in a sealed plastic bag and crush them with a rolling pin.
Transfer the crumbs to a mixing bowl and add the melted butter. Mix until the crumbs resemble wet sand. Add the sugar if you prefer a slightly sweeter base.
Press the mixture firmly into the bottom of the prepared cake tin. Use the back of a spoon or the bottom of a glass to create an even layer. Bake for 10 minutes, then remove from the oven and allow it to cool while you prepare the filling.
Step 2: Prepare the raspberry sauce
Place the raspberries, sugar and lemon juice in a small saucepan over medium heat. Stir gently as the raspberries soften and release their juices.
Simmer for approximately five minutes. Mix the cornflour with water and stir it into the raspberry mixture. Cook for another minute until the sauce thickens slightly.
Remove from the heat and allow the raspberry sauce to cool. If you prefer a smooth sauce without seeds, push it through a fine sieve while it is still warm.
Step 3: Make the ricotta cheesecake filling
Place the ricotta in a food processor or blender and blend until smooth. This step helps remove the grainy texture that ricotta can sometimes have.
Transfer the ricotta to a large mixing bowl. Add the softened cream cheese and beat until combined. Add the castor sugar and mix until smooth.
Add the eggs one at a time, mixing gently after each addition. Avoid beating the mixture for too long because too much air can cause the cheesecake to rise and fall during baking.
Add the vanilla extract, cornflour, fresh cream, lemon zest and lemon juice. Mix until everything is combined and the filling looks smooth.
Step 4: Assemble the cheesecake
Pour the cheesecake filling over the cooled biscuit base. Gently spread it into an even layer.
Spoon small amounts of the cooled raspberry sauce over the filling. Use a skewer or thin knife to gently swirl the sauce through the cheesecake mixture. Avoid mixing it too much because you want visible raspberry patterns throughout the filling.
Keep a little raspberry sauce aside if you would like extra sauce for serving.
Step 5: Bake the cheesecake
Place the cake tin on the middle shelf of the preheated oven. Bake at 160°C for 60 to 70 minutes.
The edges should look set while the centre should still have a slight wobble when you gently move the tin. Do not wait until the entire cheesecake feels firm because it will continue setting as it cools.
If the top starts browning too quickly, loosely cover it with foil. Avoid opening the oven door repeatedly because sudden temperature changes can affect the cheesecake.
Step 6: Cool the cheesecake slowly
Turn off the oven and leave the cheesecake inside with the oven door slightly open for about 30 minutes. This gradual cooling helps reduce the chance of cracks forming.
Remove the cheesecake from the oven and allow it to cool completely at room temperature. Once cool, cover the tin and place it in the fridge for at least six hours. Overnight chilling gives the best results.
Step 7: Decorate and serve
Run a thin knife around the edge of the cheesecake before releasing the springform tin. Transfer it carefully to a serving plate.
Decorate with fresh raspberries and a light dusting of icing sugar. Add fresh mint leaves if desired. Serve chilled, with the remaining raspberry sauce on the side.
Tips for Making the Perfect Creamy Ricotta Cheesecake
Use room-temperature ingredients whenever possible. Ricotta, cream cheese and eggs mix more easily when they are not cold. This helps prevent lumps and creates a smoother filling.
Blend the ricotta before adding it to the cream cheese. Ricotta can contain small curds that remain noticeable after baking if you do not smooth it first. A food processor or blender works well for this step.
Do not overmix the filling after adding the eggs. Excess air can cause the cheesecake to puff up in the oven before sinking as it cools. Gentle mixing helps create a dense but creamy texture.
Pay attention to the baking time. A cheesecake should still have a slight wobble in the centre when you remove it from the oven. If you bake it until completely firm, the filling may become dry.
Allow enough time for chilling. Cutting the cheesecake before it has properly set can cause the slices to lose their shape. Overnight chilling gives the cleanest slices and allows the flavours to develop.
Fresh or Frozen Raspberries: Which Should You Use?
Both fresh and frozen raspberries work well in this recipe. Fresh raspberries are a good choice when they are in season and reasonably priced. They also make an attractive topping because they hold their shape when placed on the cheesecake.
Frozen raspberries are convenient and often more affordable. You do not need to thaw them before making the raspberry sauce. Add them straight to the saucepan and cook until they soften.
If you use frozen raspberries for decoration, thaw them first and drain away excess liquid. Keep in mind that thawed berries are softer than fresh ones, so they may not look as neat on top of the cheesecake.
How to Store Raspberry Ricotta Cheesecake
Store leftover raspberry ricotta cheesecake in an airtight container in the fridge. It will keep for up to four days when properly refrigerated. Keep it chilled until you are ready to serve because the filling contains dairy and eggs.
You can also freeze individual slices. Wrap each slice tightly in cling film and place it in a freezer-safe container. Freeze for up to two months for the best quality.
To serve frozen cheesecake, transfer the slices to the fridge and allow them to thaw slowly overnight. Avoid thawing the cheesecake at room temperature for long periods. Add fresh raspberries after thawing if you want to refresh the presentation.
This raspberry ricotta cheesecake is a delicious homemade dessert with a creamy centre, buttery biscuit base and fresh raspberry flavour. The combination of ricotta and cream cheese creates a smooth filling that feels rich without being too heavy. A simple raspberry sauce adds colour and a pleasant tartness that balances the sweetness of the cheesecake. Taking time to blend the ricotta, mix the filling gently and bake at a low temperature will help you achieve the best texture. Remember to let the cheesecake cool slowly and chill it for several hours before slicing. You can prepare it the day before a family gathering or special occasion to make serving easier. Whether you use fresh or frozen raspberries, this baked raspberry ricotta cheesecake is a lovely dessert that is sure to impress your family and guests.