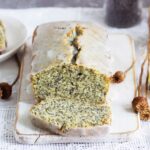
Marble cake is a classic and visually appealing treat that combines the flavors of vanilla and chocolate in a marbled pattern. If you want to create a moist and flavorful marble cake that will impress your taste buds, here are some helpful tips to guide you:
- Prep and Measure Ingredients: Before you begin, ensure that all your ingredients are at room temperature. This includes eggs, butter, and milk. Measure out all the ingredients accurately to maintain the right balance of flavors and textures in the cake.
- Quality Matters: Use high-quality ingredients, especially when it comes to cocoa powder and vanilla extract. Opt for unsweetened cocoa powder for the chocolate part of the cake, as it provides a rich and intense chocolate flavor. Choose pure vanilla extract for the best flavor.
- Alternate Wet and Dry Ingredients: To ensure a smooth and evenly mixed batter, alternate adding the dry ingredients (flour, baking powder, and salt) and the wet ingredients (milk and vanilla extract) to the creamed butter and sugar mixture. Start and end with the dry ingredients, incorporating them in batches.
- Create the Chocolate Batter: Take a portion of the cake batter and transfer it to a separate bowl. Add cocoa powder and a small amount of milk to create the chocolate batter. Mix until the cocoa powder is well combined, creating a smooth and rich chocolate mixture.
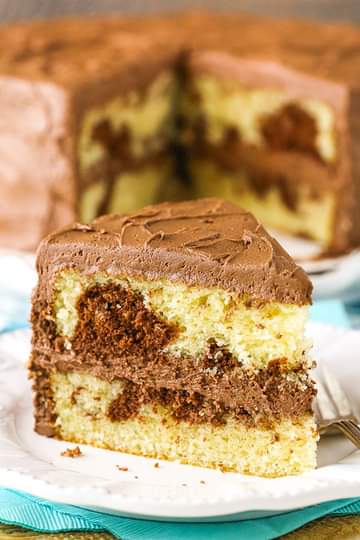
- Swirl the Batters: Once you have the vanilla and chocolate batters ready, spoon dollops of each batter into the prepared cake pan. Use a skewer or a butter knife to gently swirl the batters together, creating a marbled pattern. Be careful not to overmix, as you want distinct swirls.
- Bake at the Right Temperature: Follow the recommended baking temperature and time in the recipe. Typically, marble cakes are baked at around 350°F (175°C). Check for doneness by inserting a toothpick or cake tester into the center—it should come out clean or with a few moist crumbs attached. Avoid overbaking to maintain the moistness of the cake.
- Cool Completely: Allow the marble cake to cool in the pan for about 10 minutes before transferring it to a wire rack to cool completely. This helps the cake set and prevents it from crumbling when slicing.
- Frost or Glaze (Optional): Marble cakes can be enjoyed as is or enhanced with frosting or glaze. A classic choice is a vanilla or chocolate glaze, or you can opt for a simple dusting of powdered sugar. Frost or glaze the cooled cake, ensuring the flavors complement the marbled pattern.
- Slice and Serve: Once the marble cake is fully cooled and any frosting or glaze has set, slice it into beautiful portions and enjoy! The contrasting swirls of vanilla and chocolate make for an eye-catching presentation. Serve the cake as a delightful dessert or a sweet treat alongside a cup of coffee or tea.
- Store Properly: To maintain the freshness and moistness of the marble cake, store it in an airtight container at room temperature for up to three days. If you have leftovers, refrigerate the cake to extend its shelf life.
By following these tips, you’ll be able to create a delicious marble cake with a beautiful marbled pattern. Enjoy the process of baking, experimenting with the swirls, and savoring each moist and flavorful bite of your homemade marble cake.