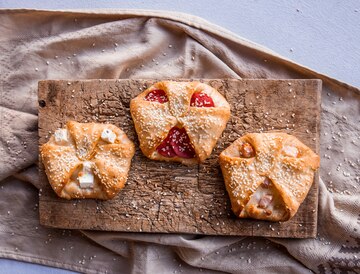
Danish pastries, with their light, flaky layers and delectable fillings, are a beloved treat that can brighten any breakfast or brunch table. While they may seem intricate, making Danish pastries from scratch is a rewarding endeavor that allows you to customize flavors and create bakery-quality pastries in your own kitchen. In this article, we’ll guide you through a step-by-step recipe for Danish pastries that will leave you with beautifully golden, melt-in-your-mouth delights. Prepare to embark on a journey of indulgence and create a batch of homemade Danish pastries that will impress everyone who tastes them.
Ingredients:
For the Dough:
- 2 1/2 cups all-purpose flour
- 1/4 cup granulated sugar
- 1 teaspoon salt
- 2 1/4 teaspoons active dry yeast (1 packet)
- 1/2 cup whole milk, lukewarm
- 2 large eggs, lightly beaten
- 1/2 cup unsalted butter, softened
For the Filling:
- Your choice of fruit preserves, cream cheese, or almond paste
For the Glaze:
- 1 cup powdered sugar
- 1-2 tablespoons milk
- 1/2 teaspoon vanilla extract
Instructions:
- Activate the Yeast:
In a small bowl, combine the lukewarm milk and sugar. Sprinkle the yeast on top and let it sit for about 5-10 minutes until it becomes frothy. This indicates that the yeast is active and ready to be used. - Mix the Dough:
In a large mixing bowl, combine the flour and salt. Create a well in the center and pour in the activated yeast mixture and lightly beaten eggs. Stir with a wooden spoon or use a stand mixer with a dough hook attachment until the dough comes together. - Knead the Dough:
Transfer the dough onto a lightly floured surface and knead it for about 5-7 minutes until it becomes smooth and elastic. Gradually incorporate the softened butter into the dough, kneading until it is fully combined. The dough should be soft and slightly sticky. - First Rise:
Place the dough in a greased bowl, turning it to coat all sides with oil. Cover the bowl with a clean kitchen towel or plastic wrap and let the dough rise in a warm place for about 1 to 1 ½ hours or until it doubles in size. - Shape the Pastries:
After the first rise, gently deflate the dough and transfer it to a lightly floured surface. Roll it out into a large rectangle, about 1/4 inch thick. Cut the dough into squares or triangles, depending on your preferred shape. - Add the Filling:
Place a spoonful of your desired filling, such as fruit preserves, cream cheese, or almond paste, in the center of each dough piece. Fold the corners or edges of the dough over the filling, creating a sealed pocket. - Second Rise:
Transfer the filled pastries onto baking sheets lined with parchment paper, leaving space between them for expansion. Cover the pastries with a towel and let them rise for another 30-45 minutes or until they have puffed up. - Preheat and Bake:
Preheat your oven to 375°F (190°C) while the pastries are rising. Once the second rise is complete, bake the pastries in the preheated oven for approximately 15-20 minutes or until they turn golden brown and flaky. - Glaze and Serve:
While the pastries are cooling on a wire rack, prepare the glaze by combining powdered sugar, milk, and vanilla extract in a bowl. Drizzle the glaze over the cooled pastries, allowing it to set before serving.
Indulging in the heavenly taste of homemade Danish pastries is a delight worth experiencing. With a bit of patience and following this step-by-step recipe, you can create an assortment of beautifully golden, flaky pastries filled with your favorite flavors. Whether enjoyed with a cup of coffee in the morning or shared with loved ones at brunch, these homemade Danish pastries will surely become a memorable treat. So, put on your apron, gather your ingredients, and embark on a baking adventure that will result in mouthwatering pastries to savor and share.


